如何使用React创建视频和动画
点击上方关注 TianTianUp,一起学习,天天进步
大家好,我是小弋。
分享的内容是:
如何使用 React Remotion 来创建视频的,如果你之前对视频很感兴趣的话,这篇文章可以参考。
正文
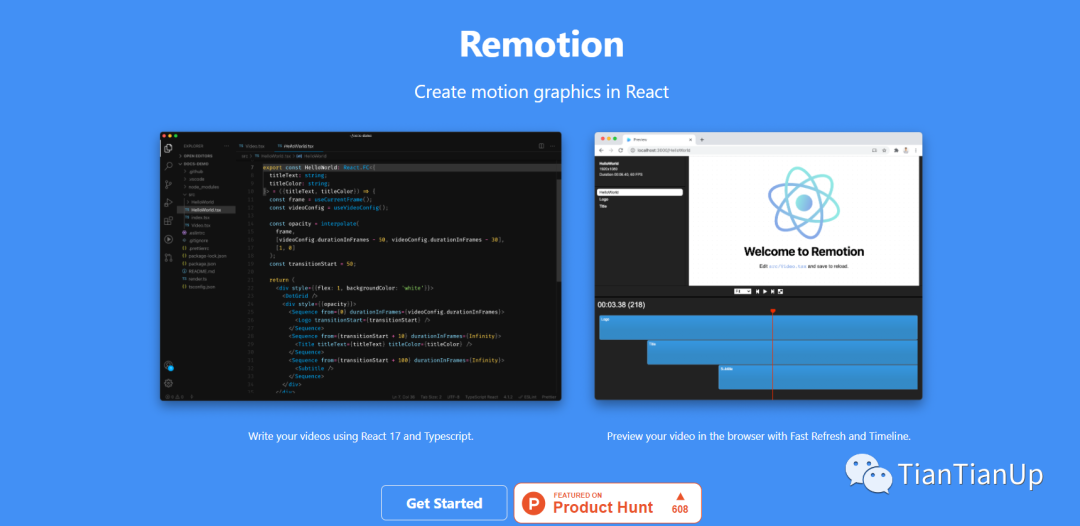
Remotion是一个最近推出的库,它允许您使用 React 创建视频和动态图形。作为一名 Web 开发人员,我发现它非常有趣,因为它为我们自己创建视频和动画打开了一扇新的大门。
它的官网:
https://www.remotion.dev/
简介
正如我提到的,Remotion是最近推出的一个令人兴奋的库,它允许你使用你最喜欢的网络技术,如HTML、CSS、JavaScript、TypeScript等来创建视频和动画。
除此之外,你还可以使用你所有关于编程、函数、算法、API的知识来为视频添加各种效果。作为一个基于React的库,Remotion能够最大限度地利用Reacts的特性,如可重用的组件、强大的组合和快速重载。
Remotion还配备了一个被称为Remotion Player的播放器,它给你带来了真正的视频编辑器的感觉,它可以用浏览器来播放和审查你的视频。
如何设置Remotion?
创建一个新的Remotion项目是非常简单的。但有两个依赖项你应该先安装。
步骤1:安装NodeJS和FFMPEG
由于安装NodeJS是非常常见的,我将重点介绍安装FFMPEG。首先,你需要从他们的下载页面下载合适版本的FFMPEG。
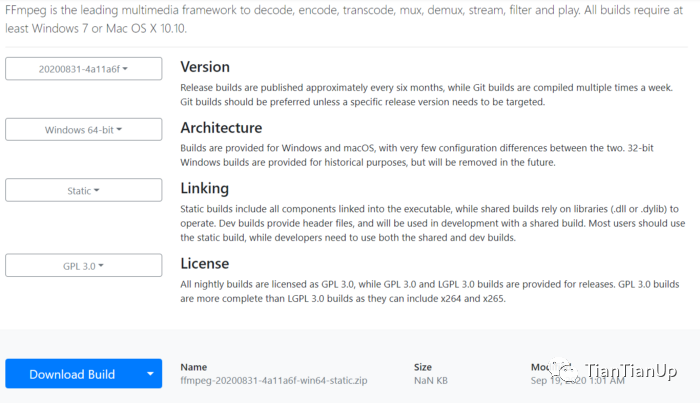
然后将其解压到你选择的文件夹中,并在CMD中以管理员权限运行以下命令(在windows中)来更新你的路径变量。
setx /M PATH "path\to\ffmpeg\bin;%PATH%"
第2步:启动新项目
安装完上述依赖后,初始化一个新的Remotion视频只需要一个命令,你可以使用yarn或npm来实现。
yarn create video
or
npm init video
你已经成功地初始化了你的第一个Remotion项目,你可以使用npm run start来启动该项目。
Remotion的基础知识
既然你已经启动了你的Remotion项目,你可以开始创建你的视频。但我认为在这之前,如果你对Remotion的基础知识有一定的了解会更好。
Video Properties
Width, height, durationInFrames, fps是由Remotion提供的视频属性。
你可以在组件中使用这些属性来配置组件的像素大小,该组件应该播放多少帧,以及每秒钟的帧数。
import { useVideoConfig } from “remotion”;export const ExampleVideo = () => {
 const { fps, durationInFrames, width, height } = useVideoConfig();return (
 <div style={{ flex: 1, justifyContent: “center”, alignItems: “center” }}>
   This video is {durationInFrames / fps} seconds long.
 </div>
 );
};
建议使用useVideoConfig派生这些属性,就像上面的例子一样,使你的组件可以重复使用。
Compositions
Compositions也是Remotion中的一种组件,在这里你可以使用上述属性作为元数据。
import {Composition} from 'remotion';
import {HelloReaders} from './HelloReaders';export const RemotionVideo: React.FC = () => {
 return (
   <>
    <Composition
     id=”HelloReaders”
     component={HelloReaders}
     durationInFrames={150}
     fps={30}
     width={1024}
     height={720}
     defaultProps={{
      titleText: ‘Welcome to My Blog’,
      titleColor: ‘black’,
     }}
    />
    <Composition
     ...
    />
    <Composition
     ...
    />
  </>
 );
}
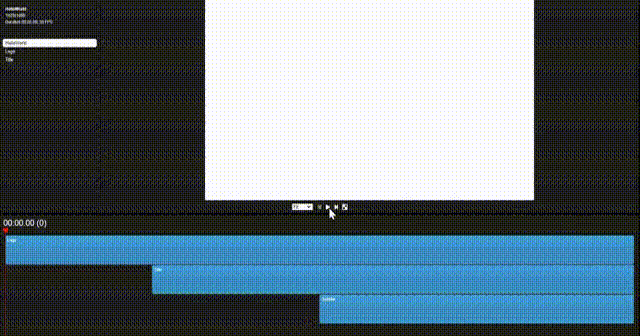
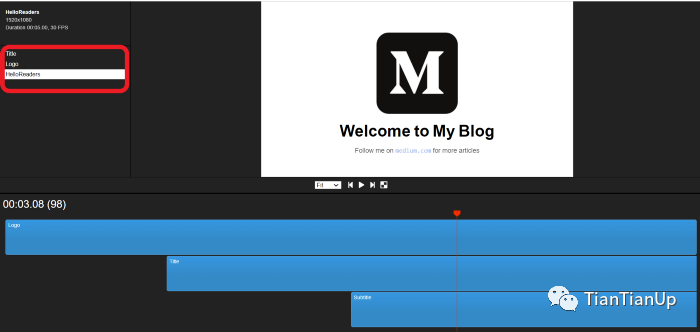
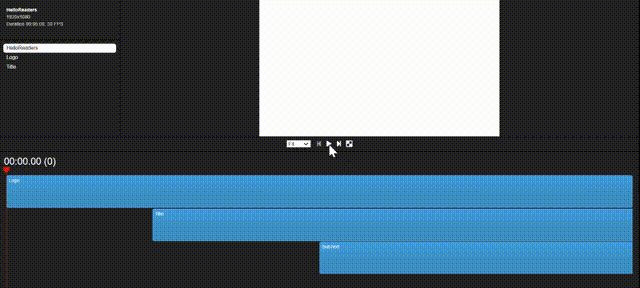
如果你观察项目中的Video.tsx文件,你会看到3个Composition组件,每个组件中都有元数据,包括视频属性。
同时,这些组合也显示在Remotion Player的左上角。
Animation Properties
当涉及到视频时,动画是最重要的,而Remotion为您提供了配置一些惊人的动画的自由。例如,如果你需要一个简单的脸部效果,你可以逐帧调整帧的不透明度。
const frame = useCurrentFrame();
const opacity = frame >= 20 ? 1 : (frame / 20);
return (
 <div style={{
   opacity: opacity
 }}>
  Hello Readers!
 </div>
)
除此之外,Remotion还有2个内建的函数,名为interpolate和spring,你可以用它们来建立更高级的动画。
插值函数接受4个输入参数,包括输入值(主要是帧),输入可以承担的范围值,你想把输入映射到的数值范围,以及一个可选参数。
弹簧动画通过使动画更自然,让你在演示中更有创意。例如,下面的弹簧动画配置会给你的文本添加一个小的缩放效果。
const {fps} = useVideoConfig();
const scale = spring({
  fps,
  from: 0,
  to: 1,
  frame
});return (
  <span
    style={{
      color: titleColor,
      marginLeft: 10,
      marginRight: 10,
      transform: `scale(${scale})`,
      display: ‘inline-block’,
    }}
  >
  Welcome to My Blog
  </span>
)
Sequence Component
Remotion中的 Sequence组件完成了2个主要任务。它主要是用来给视频中的元素分配不同的时间框架。在保持元素之间的联系的同时,它也允许你重复使用同一个组件。
Sequence组件是一个高阶组件,它有能力容纳子组件。除此之外,它还接受3个prop,包括2个必需的prop和1个可选的prop。
name : 这是一个可选的prop。你指定的名字将出现在Remotion播放器的时间线上。如果你使用正确的命名模式,你将能够理解每个组件是如何连接的。
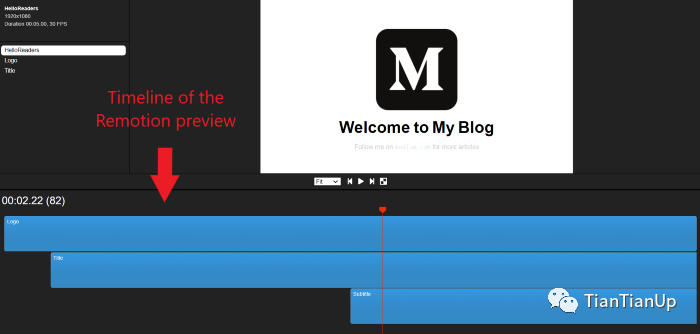
from: 这定义了框架,该组件应该出现在视频中。 durationInFrames: 以帧为单位的Sequence组件的长度。
例如,下面的Sequence组件将在20帧后出现在视频中,并将持续到结束,因为durationOnFrames是无限的。
<Sequence from={20} durationInFrames={Infinity}>
   <Title titleText={titleText} titleColor={titleColor} /></Sequence>
由于你现在对Remotion中的几个基本属性和组件有了基本的了解,我们可以开始使用Remotion创建第一个视频。
创建一个简单的视频
正如你在上面的例子中已经看到的,我将创建一个简单的视频来显示我的博客的标志和欢迎词,并有一些动画。
我将使用我们在文章开头创建的默认项目布局。
步骤1
首先,我为我的视频中的3个元素创建了3个组件:Logo.tsx, Title.tsx和SubText.tsx。
Logo.tsx file:
import {spring, useCurrentFrame, useVideoConfig} from ‘remotion’;
import {Img} from ‘remotion’;
import image from ‘./logo.png’
export const Logo: React.FC<{
transitionStart: number;
 }> = ({transitionStart}) => {

  const videoConfig = useVideoConfig();
  const frame = useCurrentFrame();
   return (
   <div
    style={{
     textAlign: ‘center’,
     marginTop: ‘10%’,
     width: videoConfig.width,
     height: videoConfig.height,
    }}
   >
   <Img
    style={{
     transform:`scale(${spring({
      fps: videoConfig.fps,
      frame: frame — transitionStart,
      config: {
       damping: 100,
       stiffness: 200,
       mass: 0.5,
      },
     })})`,
    }}
    src={image}></Img>
   </div>
 );
};
Title.tsx file:
import {spring, useCurrentFrame, useVideoConfig} from 'remotion';export const Title: React.FC<{
 titleText: string;
 titleColor: string;
}> = ({titleText, titleColor}) => { const videoConfig = useVideoConfig();
 const frame = useCurrentFrame();
 const text = titleText.split(‘ ‘).map((text) => ` ${text} `);
 return (
  <h1
   style={{
    fontFamily: ‘Helvetica, Arial’,
    fontWeight: ‘bold’,
    fontSize: 110,
    textAlign: ‘center’,
    position: ‘absolute’,
    bottom: 160,
    width: ‘100%’,
   }}
  >
  {text.map((text, i) => {
   return (
    <span
     key={text}
     style={{
      color: titleColor,
      marginLeft: 10,
      marginRight: 10,
      transform: `scale(${spring({
       fps: videoConfig.fps,
       frame: frame — i * 5,
       config: {
        damping: 100,
        stiffness: 200,
        mass: 0.5,
       },
      })})`,
      display: ‘inline-block’,
     }}
    >
    {text}
    </span>
   );
  })}
 </h1>
);
};
SubText.tsx file:
import {interpolate, useCurrentFrame} from 'remotion';export const Title: React.FC<{
 titleText: string;
 titleColor: string;
}> = ({titleText, titleColor}) => {

 const frame = useCurrentFrame();
 const opacity = interpolate(frame, [0, 30], [0, 1]);return (
  <div
   style={{
    fontFamily: 'Helvetica, Arial',
    fontSize: 40,
    textAlign: 'center',
    position: 'absolute',
    bottom: 140,
    width: '100%',
    opacity,
   }}
  >
   Follow me on{' '}<code> medium.com </code>{' '} for more articles
  </div>
 );
};
步骤2
然后,我把这3个组件导入到MyVideo.tsx中,并用Sequence组件包装,为每个组件分配相关的时间框架。除此之外,我还将几个prop和动画传递给子组件。
import {interpolate, Sequence, useCurrentFrame, useVideoConfig} from ‘remotion’;
import {Logo} from ‘./components/Logo’;
import {SubText} from ‘./components/SubText’;
import {Title} from ‘./components/Title’;export const MyVideo: React.FC<{
titleText: string;
titleColor: string;
}> = ({titleText, titleColor}) => {const frame = useCurrentFrame();
const videoConfig = useVideoConfig();
const opacity =
 interpolate(
  frame,
  [videoConfig.durationInFrames — 25,
   videoConfig.durationInFrames
   15
  ],
  [1, 0],
  {extrapolateLeft: ‘clamp’,extrapolateRight: ‘clamp’,}
 );
const transitionStart = 0;return (
 <div style={{flex: 1, backgroundColor: ‘white’}}>
 <div style={{opacity}}>  <Sequence
   from={0}
   durationInFrames={videoConfig.durationInFrames}>
    <Logo transitionStart={transitionStart} />
  </Sequence>  <Sequence
   from={transitionStart + 35}
   durationInFrames={Infinity}>
    <Title titleText={titleText} titleColor={titleColor} />
  </Sequence>  <Sequence
   from={transitionStart + 75}
   durationInFrames={Infinity}>
    <SubText />
  </Sequence>
 </div>
 </div>
);
};
步骤3
最后,我将上述所有文件导入Video.tsx,并使用Composition组件传递相关元数据。
import {Composition} from ‘remotion’;
import {MyVideo} from ‘./MyVideo’;
import {Logo} from ‘./components/Logo’;
import {SubText} from ‘./components/SubText’;
export const RemotionVideo: React.FC = () => {
 return (
  <>
   <Composition
    id=”HelloReaders”
    component={HelloReaders}
    durationInFrames={150}
    fps={30}
    width={1920}
    height={1080}
    defaultProps={{
     titleText: ‘Welcome to My Blog’,
     titleColor: ‘black’,
    }}
   />
   <Composition
    id=”Logo”
    component={Logo}
    durationInFrames={200}
    fps={30}
    width={1920}
    height={1080}
   />
   <Composition
    id=”Title”
    component={SubText}
    durationInFrames={100}
    fps={30}
    width={1920}
    height={1080}
   />
  </>
 );
};
现在,你就可以运行你的第一个Remotion视频了。你可以使用npm run start在开发模式下看到它,或者使用npm run build保存为mp4文件。
结论
虽然Remotion还很年轻,但它已经有了一些惊人的功能。它可能还达不到专业视频编辑器的质量。但我们肯定可以期待一些惊喜的到来。
此外,Remotion还有像参数化渲染、服务器端渲染和数据获取这样的功能,这些对于开发者来说是非常熟悉的。他们可以利用自己的经验,从这个工具中获得最大的收益。
最重要的是,对于那些寻求创建个人使用的小视频或动画的方法的人来说,它是一个很好的选择。
在我看来,我们可以利用Remotion来创建简单的视频和动画,用我们所掌握的网络开发知识。但在视频编辑功能方面,很多东西需要改进和简化。
不过,我强烈建议你下载Remotion,并给它一个机会。这将是一种全新的体验。
谢谢您的阅读!!!
最后
面试交流群持续开放,分享了近 许多 个面经。
加我微信: DayDay2021,备注面试,拉你进群。
我是 小弋,我们下篇见~